7. Video and live tracking
FlyPad Acquisition can film the arenas while it records. The video is synchronised with the FlyPad data frame by frame, the live image can show each fly’s traces right under its arena, and live tracking follows every fly’s position while you record. All of it is optional: without a camera, the FlyPad works exactly as before.
What you need
- An industrial camera with a USB3 Vision or GigE Vision interface, and its maker’s driver installed (for Hikrobot cameras: MVS). FlyPad Acquisition finds any camera whose maker provides a GenTL driver. It was developed with a Hikrobot MV-CA013-A0UM (1280 × 1024, monochrome).
- Light from the camera’s side, so that each fly looks darker than the arena floor. Live tracking finds the fly as a dark spot.
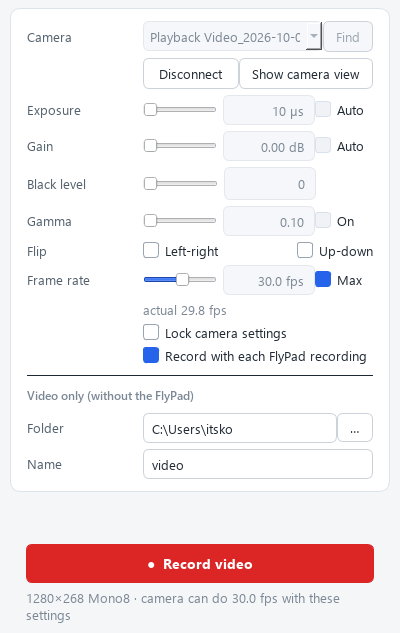
Camera card
-
Find lists the cameras; choose yours and click Connect. If another program (for example MVS, or a FlyPad Acquisition that did not close properly) still holds the camera, Connect stops it and tells you so (Released the camera from: …).
-
Set the image:
Setting What it does Exposure Longer = brighter image, but moving flies blur. Auto lets the camera follow the light; it is off by default, so the image does not change when the OptoPad LEDs flash Gain Brighter image, more noise Black level Raises the darkest parts of the image Gamma Brightens the mid-tones Flip Mirrors the image horizontally or vertically Frame rate Frames per second; Max = as fast as the exposure and USB allow. The line below shows the actual rate The settings are saved for each camera and applied every time it connects (cameras forget them when switched off). Lock camera settings greys them out until unticked.
-
Record with each FlyPad recording (ticked): every FlyPad recording also records a video, with the same name and folder, synchronised with it.
-
Video only (without the FlyPad): choose a Folder and a Name, then click ● Record video. An existing file is never overwritten.
Camera view
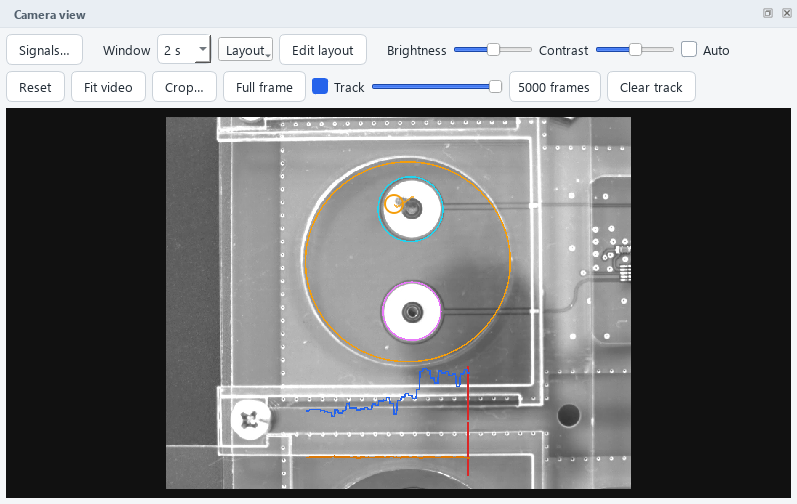
Show camera view opens the live image. It is a dock, like every card: drag it anywhere, or use View → Camera beside the traces / Camera above the traces / Large camera view. View → Reset layout puts every card back in its default place.
| Control | What it does |
|---|---|
| Signals… | Which channels are shown, and how: raw, low-pass filtered, baseline-subtracted, derivative, lick signal, walking speed |
| Window | Seconds of trace shown (2–60 s) |
| Layout | Traces below the video, Traces over the video, Free (place each panel anywhere; Edit layout shows drag bars and resize corners), or Under each arena: each fly’s two channels right under its arena (needs the arenas of live tracking) |
| Brightness / Contrast | Display only: the recorded video stays as the camera took it. Auto stretches each frame; Reset goes back to the camera’s image |
| Fit video | Shows the whole image. Zoom with the mouse wheel over the video, move it by dragging |
| Crop… | Crops the camera itself (see below) |
| Track | Draws each fly’s path over the video; the slider sets how many positions, Clear track starts again |
Over the video, the traces have no axes, so they do not cover the arenas. A fly’s two channels share one scale: when the fly feeds on one food, that trace swings and the other stays flat. Right-click a trace for its menu (for example View All); drag with the right mouse button to rescale it. The mouse wheel does not zoom the traces.
Cropping the camera
Crop… shows a rectangle on the video: drag and resize it around the arenas, then click Apply crop. The camera then sends only that part of its sensor, which allows a higher frame rate and smaller videos. Full frame undoes it. The arenas move with the crop, so they do not need to be drawn again. Cropping is not possible while a video is recording.
Live tracking
1. Draw the arenas
Click Arenas…. For each arena, draw its floor (orange ellipse) and its two food electrodes (cyan = left, magenta = right), and enter its two FlyPad channels.
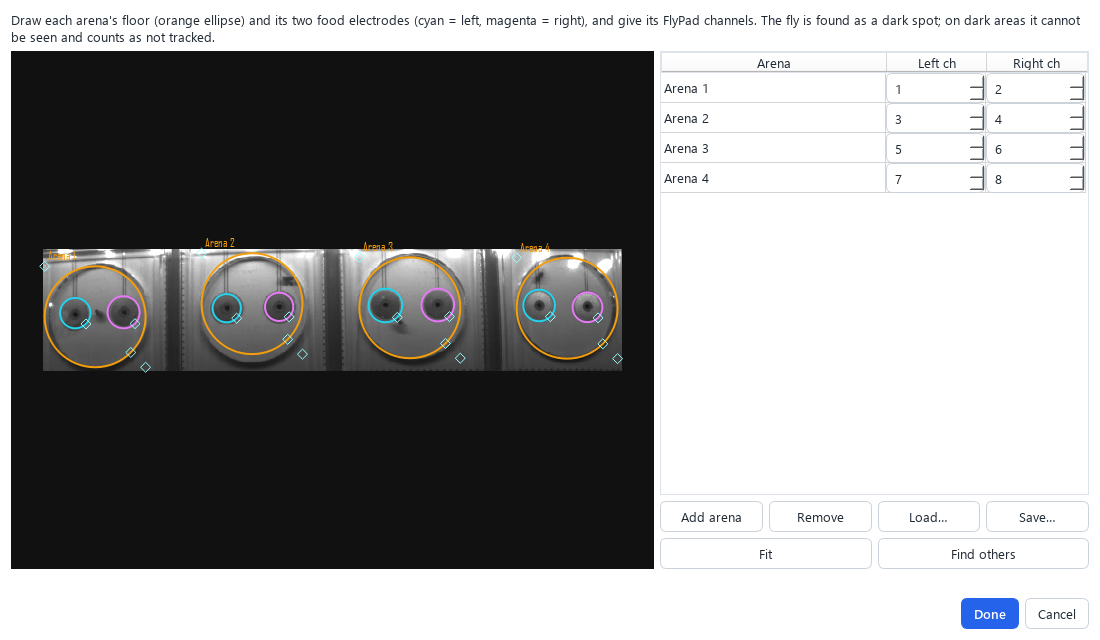
The quick way: draw the first arena roughly and click Fit to snap it to the image, then Find others to find and fit every other arena of the same size and layout; their channels continue from the first (3-4, 5-6, …). Add arena adds one more of the same size and layout, next to the last. Save… / Load… keep a set of arenas in a file.
2. Start tracking
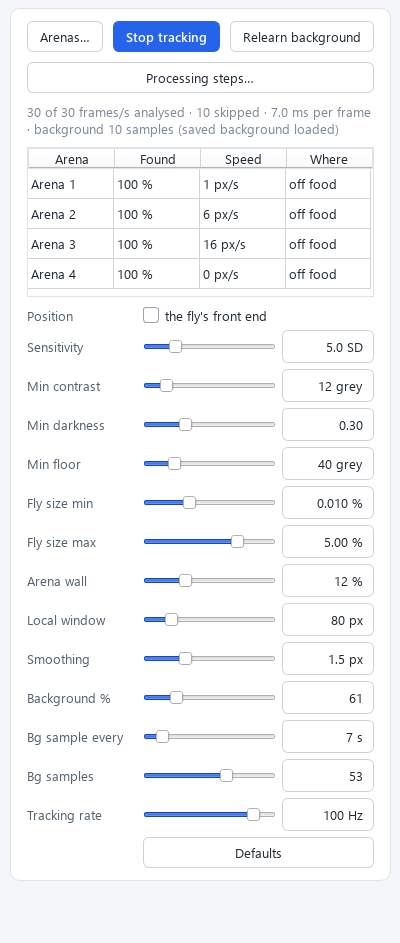
Click Start tracking. The tracker first learns the background (the empty arenas) from the moving flies, then finds each fly as a dark spot that is not part of the background. The card shows how many frames per second it analyses and, for each arena, how often the fly was found in the last 10 s, its speed, and where it is (left food, right food or off food). In the camera view, a ring marks each fly; if a fly is lost for a moment, the ring stays at its last position.
While a video records, every position is saved next to it (see Files below). This makes the later analysis instant (see Review).
3. Adjust, if needed
The defaults suit a dark fly on a light floor. Processing steps… shows, live and side by side, each stage that leads to the fly’s position for one arena: the image, the background, what is darker than the background, the local contrast, the threshold, and which test each pixel failed. Every tracking setting is beside the panels, so you see the effect of a change at once.
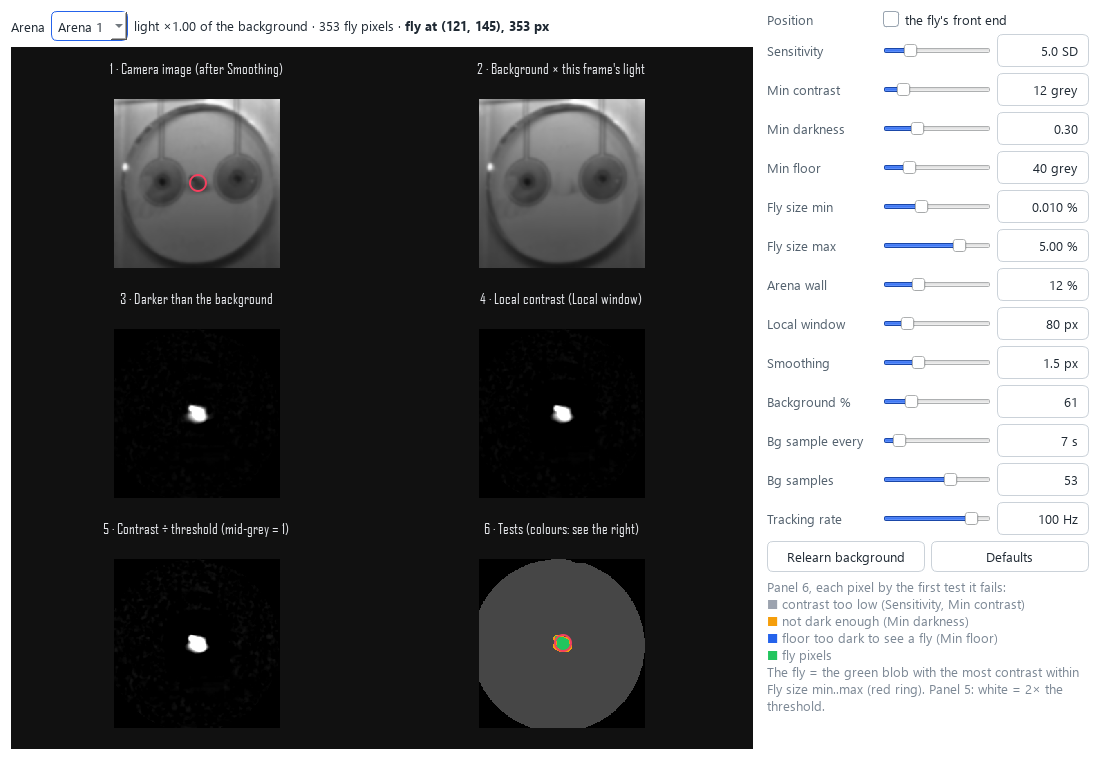
| Setting | What it does |
|---|---|
| Position | Off (default): the centre of the fly. Ticked: the fly’s front end |
| Sensitivity | How many noise SDs a fly pixel must differ from the background (lower = more sensitive) |
| Min contrast / Min darkness | A fly pixel must also be at least this many grey levels, and this fraction, darker |
| Min floor | Where the floor is darker than this, a dark fly cannot be seen and is not searched |
| Fly size min / max | Smaller dark spots are noise, larger ones shadows or light changes (% of the arena floor) |
| Arena wall | The fly is also searched this far outside the drawn floor, because flies walk on the wall |
| Local window | Contrast is measured against this neighbourhood, which removes slow changes of the light |
| Smoothing | Blurs each frame slightly before comparing it with the background, which removes camera and light noise |
| Background %, Bg sample every, Bg samples | How the background is built from samples taken while tracking |
| Tracking rate | Frames analysed per second; above the camera’s rate = every frame |
Relearn background starts the background again; use it after moving an arena, the lid or a light. Defaults restores every setting.
Limits
- A fly that has not moved at all since tracking started is part of the background and is not found until it moves. Start tracking before loading the flies, or let them walk first.
- A fly that sits still for more than 10 minutes slowly becomes part of the background and is lost; the analysis then keeps it at its last position (marked as filled).
- On dark parts of the arena (for example dark electrodes), a dark fly cannot be seen.
Files
| File | Content |
|---|---|
Video_<date>T<time>.mp4 |
The video (H.264). The name has the same date and time as the FlyPad recording |
Video_<…>_frames.csv |
For every video frame: its number, the camera’s timestamp and the PC time when it arrived |
Video_<…>.json |
The camera settings of this video |
CapacitanceData_…_clock.csv |
For every FlyPad frame, its device time and the PC time; written when a video records. Together with _frames.csv it places each video frame on the FlyPad’s time axis (precise to about 2 ms) |
Video_<…>_live_tracking.csv |
Live tracking: every position of every fly while the video recorded |
Video_<…>_arenas.json, Video_<…>_live_tracking.json |
The arenas and the tracking settings of these positions |
If the PC has an NVIDIA graphics card, the video is encoded on it; otherwise on the processor. Either way, video and tracking run at a lower priority than the FlyPad, so the FlyPad data is never delayed. If the PC cannot keep up, video frames are dropped (the card counts them) and never FlyPad frames.